This blog is mostly about robots, but not exclusively. 🙂
I needed an NTP server at home, as my security cameras were drifting out of sync. So, I thought I’d create a Stratum 1 NTP Server, with a Raspberry Pi and a GPS receiver.
There are lots of guides on the web, so I just followed the instructions, but it was very easy, once you understand the basics. There are two ways to synchronise the time on the Raspberry Pi to a GPS receiver. The first is just to use the GPS NMEA data to get the time. With a 1 Hz update, you have be accurate to about a second. However, some GPS receivers provide a pulse-per-second output, that provides a digital signal every second that can be attached to a hardware interrupt and this can be accurate to a microsecond.
Nearly all the instructions I used came from here :
I did a couple of other things too, as I had trouble keeping my Raspberry Pi’s running for longer than 3 months on an SD card. After 3 months of being continuously on, I usually got SD card corruption and the server died. I decided to switch this Raspberry Pi to use a USB flash drive to the filing system, and the SD card, just to boot.
The instructions for using a USB flash filing system are here :
I did this first, then configured the GPS / NTP. For this post, I’ll ignore the USB configuration, and it’s not relevant to the GPS / NTP install. It’s up to you if you need it. I’ve heard of lots of people that have run a Raspberry Pi for over a year on an SD card without any issues, and others who have had the same issues as me, with no more than a few months without file system corruption.
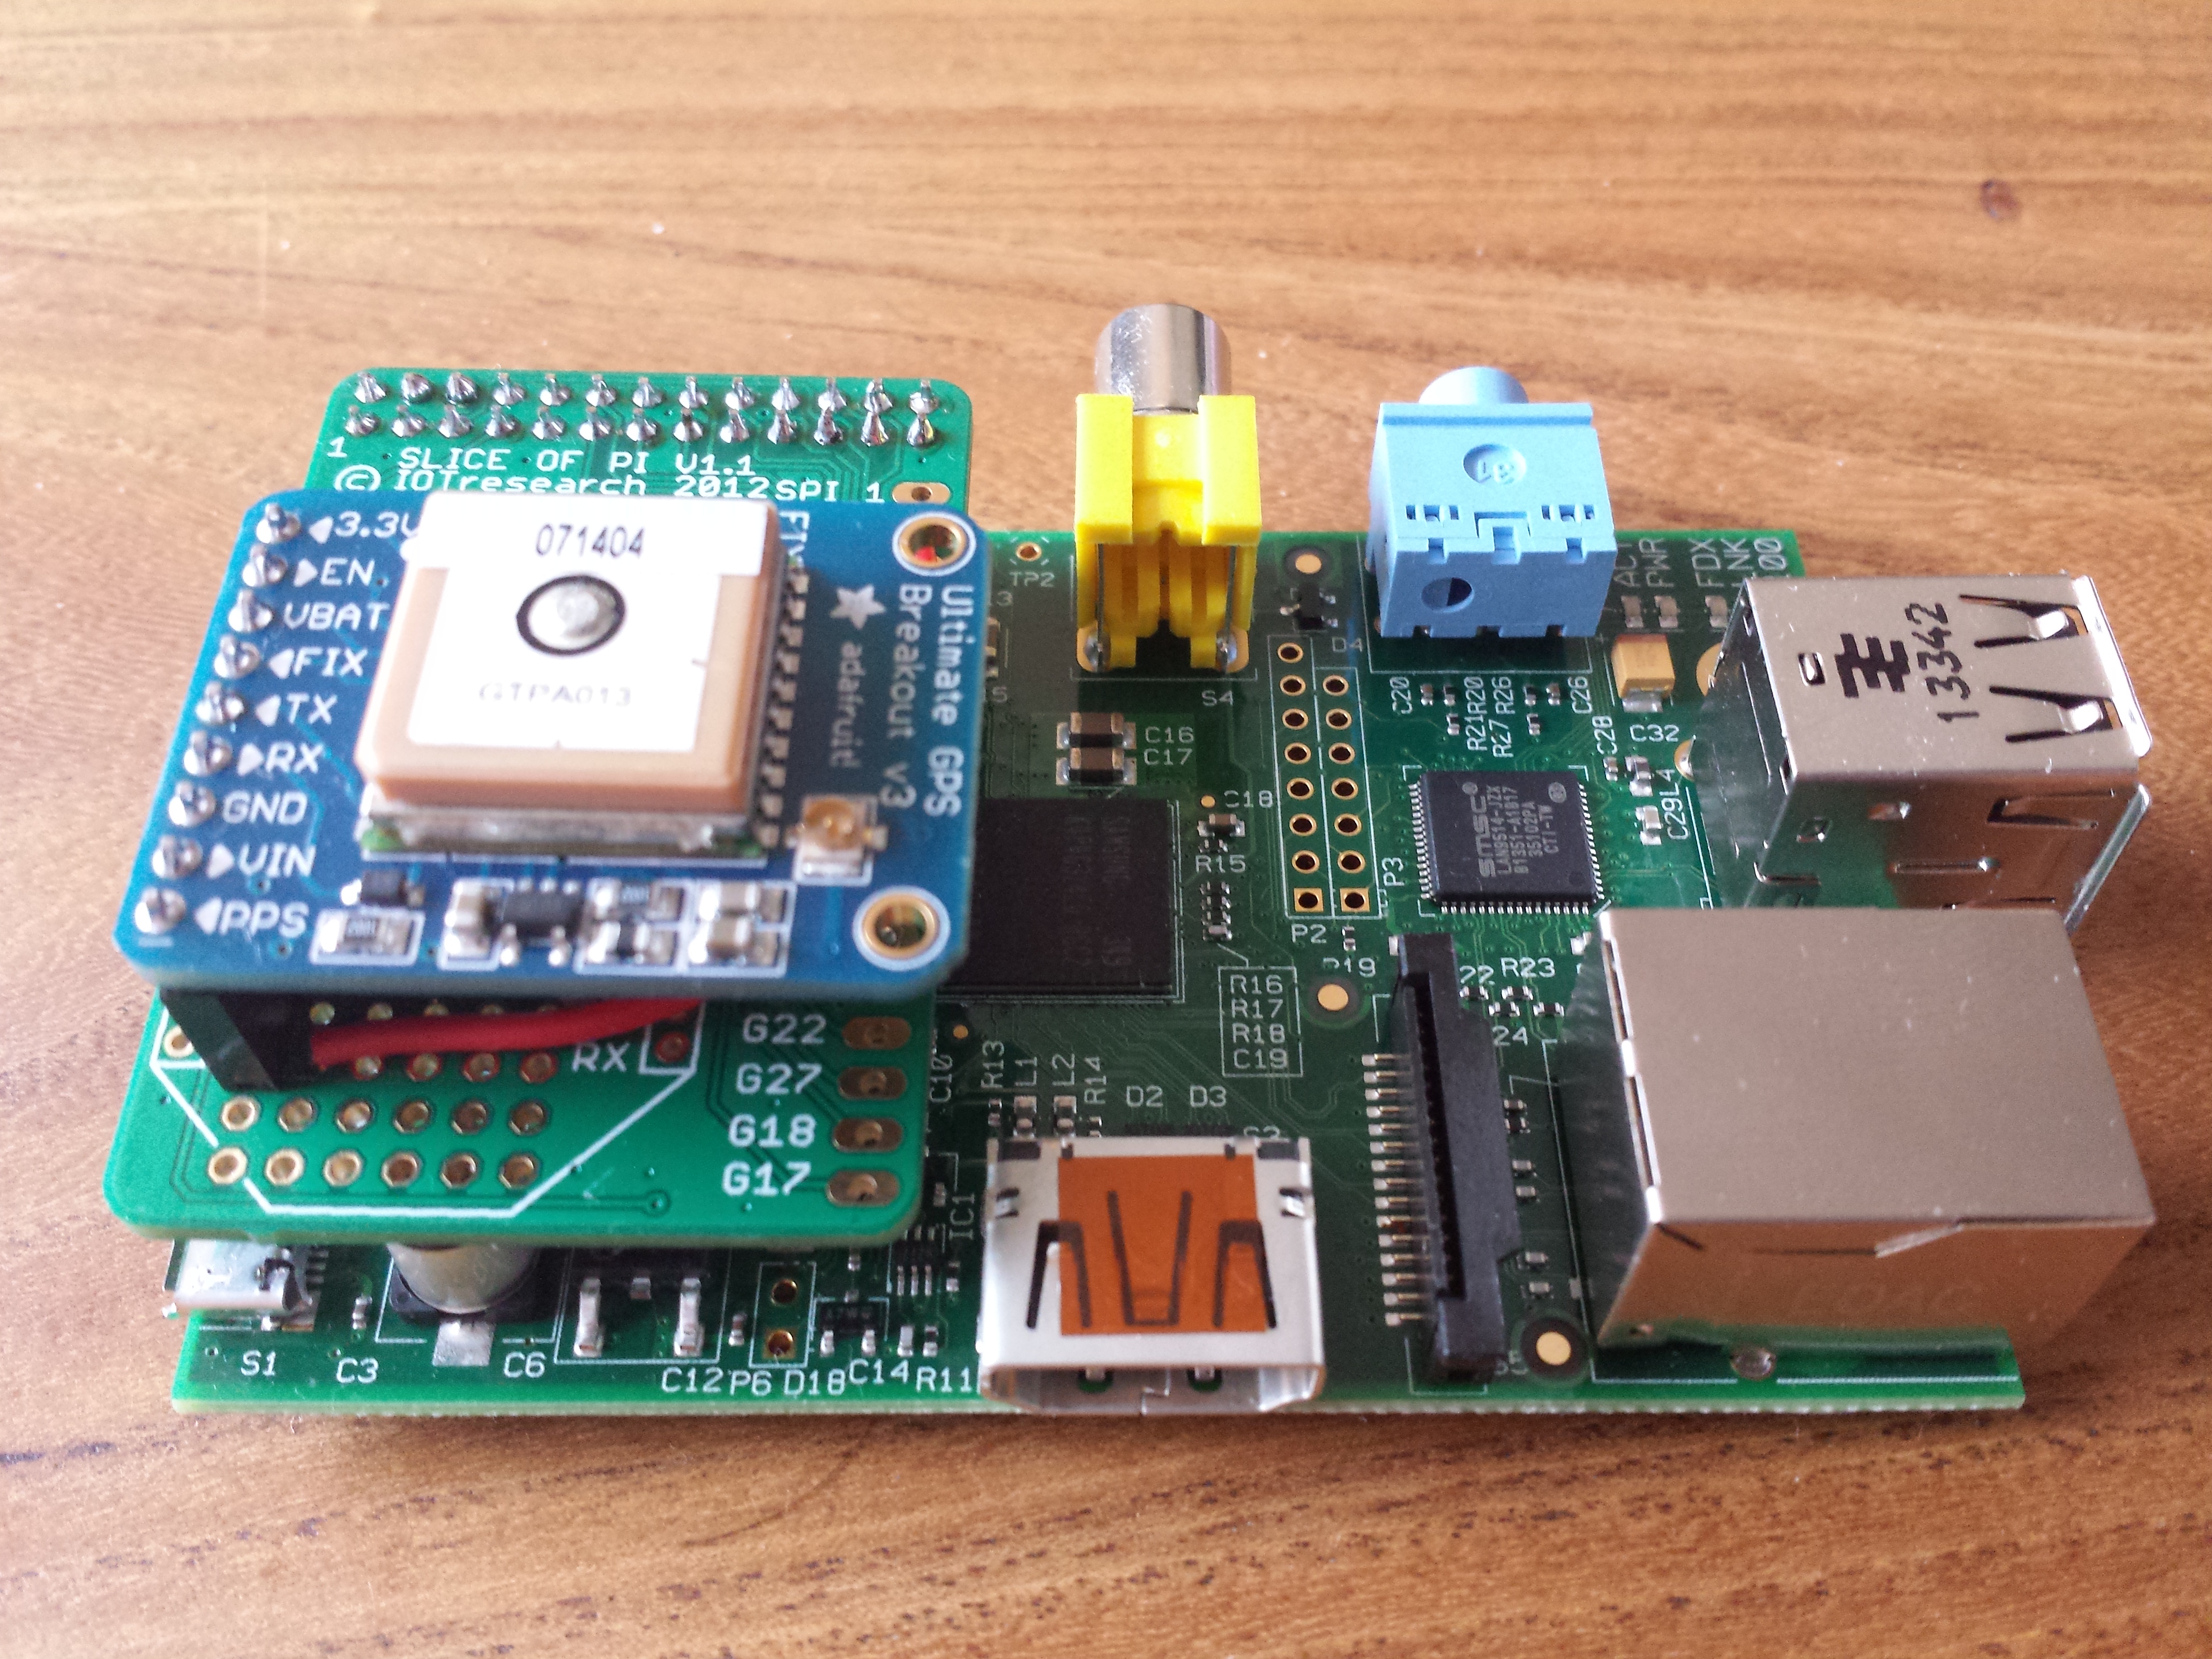
The first thing to do is connect the GPS receiver to the RPi. I used an Adafriut Ultimate GPS breakout board. It has lots of useful features; it’s cheap, it’s easy to connect as it has 0.1” headers, it has a PPS output, it’s 3.3v and it has an external aerial mount.
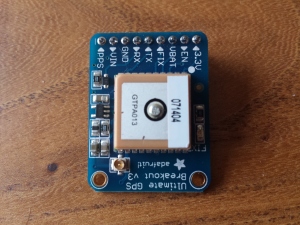
Adafruit Ultimate GPS Breakout Board
The only problem I found with these GPS units is I couldn’t find a way to permanently change the baud rate. If you set the baud rate on the GPS receiver, the setting doesn’t survive a power cycle. If anyone knows how to do this, let me know. Even in production I am running the GPS at 9600 baud. I would have preferred to run it at a faster rate, which would give better accuracy as the NMEA data can be processed faster. But seeing as the clock is set using the PPS, its not a major issue.
I used a Slice of Pi prototype board to make it easy to connect the GPS to the Raspberry Pi. The wiring is straight forward, 3.3v and Gnd, Tx & Rx, and the PPS connected to GPIO pin 8.
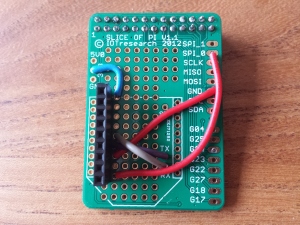
Slice of Pi prototype board
I also have a Power Over Ethernet switch, so I added a PoE power adapter, so the Raspberry Pi would have minimal wiring. I bought a plastic box from Maplins and mounted the PoE adapter, RPi, GPS and external GPS connector all in the box. The box had a clear plastic lid, which also means you can see the RPi in action.
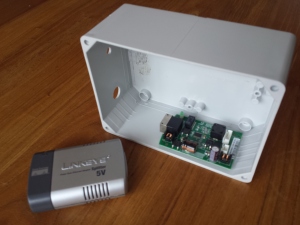
Power Over Ethernet adapter
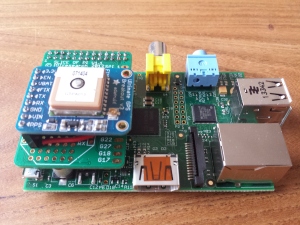
Assembled Raspberry Pi NTP Server
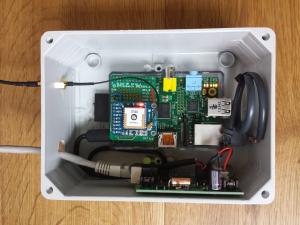
Assembled Raspberry Pi NTP Server in case with PoE
Once the hardware was attached, the software configuration follows the instruction linked above.
1. Disable serial comms on the console. We need it for the GPS.
Disable console output to serial
sudo vi /boot/cmdline.txt
find this :
dwc_otg.lpm_enable=0 console=ttyAMA0,115200 kgdboc=ttyAMA0,115200 console=tty1 root=/dev/mmcblk0p2 rootfstype=ext4 elevator=deadline rootwait
and edit it to this :
dwc_otg.lpm_enable=0 console=tty1 root=/dev/mmcblk0p2 rootfstype=ext4 elevator=deadline rootwait
Disable the login prompt
sudo vi /etc/inittab
find the line near the end
T0:23:respawn:/sbin/getty -L ttyAMA0 115200 vt100
add # to comment it out.
#T0:23:respawn:/sbin/getty -L ttyAMA0 115200 vt100
2. Configure Static IP
I need my NTP server to have a static IP
If you use DHCP, remove “ntp-servers” from the “request” line in /etc/dhcp/dhclient.conf
Remove /var/lib/ntp/ntp.conf.dhcp if present
sudo vi /etc/network/interfaces
Edit the following entry:
iface eth0 inet dhcp
Change it to (using your local network settings):
iface eth0 inet static
address 10.1.0.128
netmask 255.255.255.0
gateway 10.1.0.1
network 10.1.0.0
broadcast 10.1.0.255
reboot…
At this point you should see the GPS NMEA data coming from the serial port. Test it like this :
sudo cat /dev/ttyAMA0
If you dont see NMEA data, go back and check your wiring and baud settings.
3. Install gpsd
sudo apt-get install gpsd gpsd-clients python-gps
sudo gpsd /dev/ttyAMA0 -F /var/run/gpsd.sock
test it recieves GPS data :
sudo cgps –s

+-------------------------------------------++---------------------------------+
|    Time:       2014-07-07T22:34:15.000Z   ||PRN:   Elev:  Azim:  SNR:  Used: |
|    Latitude:    51.501114 N               ||  20    73    246    32      Y   |
|    Longitude:   -0.142448 W               ||   1    72    117    44      Y   |
|    Altitude:   99.8 m                     ||  32    61    068    51      Y   |
|    Speed:      0.0 kph                    ||  11    45    142    38      Y   |
|    Heading:    67.1 deg (true)            ||  17    43    296    21      Y   |
|    Climb:      0.0 m/min                  ||  33    29    199    00      Y   |
|    Status:     3D FIX (10 secs)           ||  23    28    180    00      Y   |
|    Longitude Err:   +/- 4 m               ||   4    20    294    28      Y   |
|    Latitude Err:    +/- 3 m               ||  31    12    085    42      N   |
|    Altitude Err:    +/- 9 m               ||  14    11    035    17      N   |
|    Course Err:      n/a                   ||  28    08    250    00      N   |
|    Speed Err:       +/- 31 kph            ||  13    02    191    00      N   |
|    Time offset:     0.662                 ||  19    01    161    00      N   |
+-------------------------------------------++---------------------------------+
4. Configure gpsd to auto start
sudo dpkg-reconfigure gpsd
The configuration program will ask you a series of questions :
Start gpsd automatically? Yes
Should gpsd handle attached USB GPS receivers automatically? No
Device the GPS receiver is attached to: /dev/ttyAMA0
Options to gpsd: -n
gpsd control socket path: /var/run/gpsd.sock
reboot…
sudo cgps –s
You should get the same output as before. This shows everything is starting up correctly on boot.
5. Configure NTP
Make a backup of the ntp.conf file. Edit the conf file.
sudo cp /etc/ntp.conf /etc/ntp.old.conf
sudo vi /etc/ntp.conf
Remove the IP access restrictions
Comment out :
restrict -4 default kod notrap nomodify nopeer noquery

#restrict -4 default kod notrap nomodify nopeer noquery
Configure NTP to use the UK NTP pool servers.
I’m in the UK. If you’re not, pick the most local pool to you.
Replace:
server 0.debian.pool.ntp.org iburst
server 1.debian.pool.ntp.org iburst
server 2.debian.pool.ntp.org iburst
server 3.debian.pool.ntp.org iburst
With:
pool uk.pool.ntp.org iburst
Add the local NTP server from your ISP.
server ntp.eclipse.co.uk iburst
Restart NTP and check its working.
sudo /etc/init.d/ntp restart
sudo ntpq -p -n

     remote           refid      st t when poll reach   delay   offset  jitter
==============================================================================
*213.249.130.101 10.100.94.8      2 u    3   64  377  120.208   37.434  53.254
+87.124.126.49   195.66.241.3     2 u   10   64  377   32.008   -8.111  99.007
 82.219.4.30     .INIT.          16 u    - 1024    0    0.000    0.000   0.000
 217.10.144.130  .INIT.          16 u    - 1024    0    0.000    0.000   0.000
-151.230.30.222  103.7.151.4      2 u   25   64  377   47.016    0.743  98.865
Basic NTP is now working, but without GPS. Even without GPS, its still accurate to about 37ms.
6. Add the GPS configuration to NTP
Edit ntp.conf
sudo vi /etc/ntp.conf
add :
# Server from shared memory provided by gpsd
server 127.127.28.0 minpoll 4 maxpoll 4
fudge  127.127.28.0 time1 0.000 refid GPS
Restart NTP and check its working.
sudo /etc/init.d/ntp restart
sudo ntpq -p -n

     remote           refid      st t when poll reach   delay   offset  jitter
==============================================================================
*127.127.28.0    .GPS.            0 l    7   16  377    0.000   -353.23 15.024
-213.249.130.101 10.100.94.8      2 u   62   64  377   52.603   -3.554  77.753
-87.124.126.49   195.66.241.3     2 u    6   64  377   42.207   -5.468  78.352
 82.219.4.30     .INIT.          16 u    - 1024    0    0.000    0.000   0.000
 217.10.144.130  .INIT.          16 u    - 1024    0    0.000    0.000   0.000
+151.230.30.222  103.7.151.4      2 u   16   64  377   47.016    0.743  58.425
Adjust the time1 fudge offset to compensate for drift. The GPS NMEA input is taking about 350ms to process.
fudge 127.127.28.0 time1 0.350 refid GPS
Restart NTP and check again. The GPS inout should be more accurate. (now only 11ms out)
     remote           refid      st t when poll reach   delay   offset  jitter
==============================================================================
*127.127.28.0    .GPS.            0 l    3   16  377    0.000   11.721  38.208
+213.249.130.101 10.100.94.8      2 u   33   64  377   72.434    1.227  98.033
-87.124.126.49   195.66.241.3     2 u   48   64  377   50.215   -0.824  76.877
 82.219.4.30     .INIT.          16 u    - 1024    0    0.000    0.000   0.000
 217.10.144.130  .INIT.          16 u    - 1024    0    0.000    0.000   0.000
-151.230.30.222  103.7.151.4      2 u   56   64  377   48.522    0.481  50.334
7. Install user mode PPS module
For more details see : http://vanheusden.com/time/rpi_gpio_ntp/
sudo wget http://vanheusden.com/time/rpi_gpio_ntp/rpi_gpio_ntp-1.3.tgz
sudo tar -zxvf rpi_gpio_ntp-1.3.tgz
sudo cat rpi_gpio_ntp-1.3/readme.txt
Read the instructions. You must build and install the program:
sudo cd rpi_gpio_ntp-1.3
sudo make install
You probably want to let rpi_gpio_ntp start at boot.
To do so, edit /etc/rc.local
sudo vi /etc/rc.local
and add the following line (BEFORE the “exit 0” statement and AFTER the “#!/bin/sh” line):
/usr/local/bin/rpi_gpio_ntp -N 1 -g 8
This assumes that the PPS signal of the GPS is connected to GPIO pin 8 which is physical pin 24.
reboot…
8. Add the PPS configuration to NTP
Edit ntp.conf
sudo vi /etc/ntp.conf
add :
# Server from PPS module
server 127.127.28.1 minpoll 4 maxpoll 4 prefer
fudge  127.127.28.1 refid PPS
Restart NTP and check its working.
sudo /etc/init.d/ntp restart
sudo ntpq -p -n

     remote           refid      st t when poll reach   delay   offset  jitter
==============================================================================
+127.127.28.0    .GPS.            0 l   15   16  377    0.000   65.031  38.403
*127.127.28.1    .PPS.            0 l   14   16  377    0.000    0.001   0.006
x213.249.130.101 10.100.94.8      2 u   12   64  377   79.034   16.835  82.844
+87.124.126.49   195.66.241.3     2 u   26   64  377   28.945    1.316  42.948
 82.219.4.30     .INIT.          16 u    - 1024    0    0.000    0.000   0.000
 217.10.144.130  .INIT.          16 u    - 1024    0    0.000    0.000   0.000
-151.230.30.222  103.7.151.4      2 u   39   64  377   36.126    2.120  57.079
This shows the Raspberry Pi system clock is accurate to 1us !!
My final ntp.conf file :
driftfile /var/lib/ntp/ntp.drift

statistics loopstats peerstats clockstats
filegen loopstats file loopstats type day enable
filegen peerstats file peerstats type day enable
filegen clockstats file clockstats type day enable

# Server from shared memory provided by gpsd
server 127.127.28.0 minpoll 4 maxpoll 4
fudge  127.127.28.0 time1 0.550 refid GPS

# Server from PPS module
server 127.127.28.1 minpoll 4 maxpoll 4 prefer
fudge  127.127.28.1 refid PPS

# You do need to talk to an NTP server or two (or three).
server ntp.eclipse.co.uk iburst

# pool.ntp.org maps to about 1000 low-stratum NTP servers.  Your server will
# pick a different set every time it starts up.  Please consider joining the
# pool:
pool uk.pool.ntp.org iburst

# By default, exchange time with everybody, but don't allow configuration.
#restrict -4 default kod notrap nomodify nopeer noquery
#restrict -6 default kod notrap nomodify nopeer noquery

# Local users may interrogate the ntp server more closely.
restrict 127.0.0.1
restrict ::1
The final NTP Server installed in my garage, with an external GPS aerial on the roof.
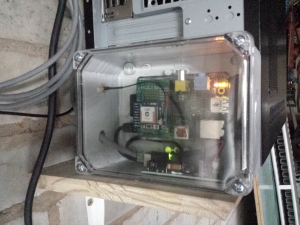
Assembled Raspberry Pi NTP Server in case with PoE