
I wanted to monitor internal and external temperatures as part of my home automation, so I decided to use Wemos D1 mini boards for this, running Tasmota, as they are small, feature rich and really inexpensive (about $2 each).
The Wemos D1 mini is a fully functional ESP8266 board with built in WiFi antenna, 11 GPIO pins that support protocols like SPI & I2C, an analog input and USB interface. There are also many shields that provide lots of different features like temperature sensors, OLED Screens, Relays, LEDs, etc. You can buy the boards and shields on AliExpress. I particularly like the OLED displays and the temperature sensor board.
I initially designed a custom PCB for the old ESP01 development boards, which contained a USB to 3.3v power supply and space for a DS18B20. However, most of the ESP01 boards only have 512kB of Flash which is too small to easily enable over-the-air updates for the firmware. So, I quickly switched to the Wemos D1 Mini boards instead.

ESP01 DS18B20 Temperature Sesnor Board
Although it is trivial to attach a 1-wire DS18B20 temperature sensor to the Wemos, a shield makes the wiring neater.

Wemos SHT30 Temperature and Humidity Sensor Shield
The Wemos SHT30 Temperature Shield contains a SHT30 sensor, which provides accurate temperature and humidity readings over an I2C interface. Configuring the temperature sensor in Tasmota is trivial. Just configure the I2C pins in the admin interface and temperature and humidity is displayed on the home page.
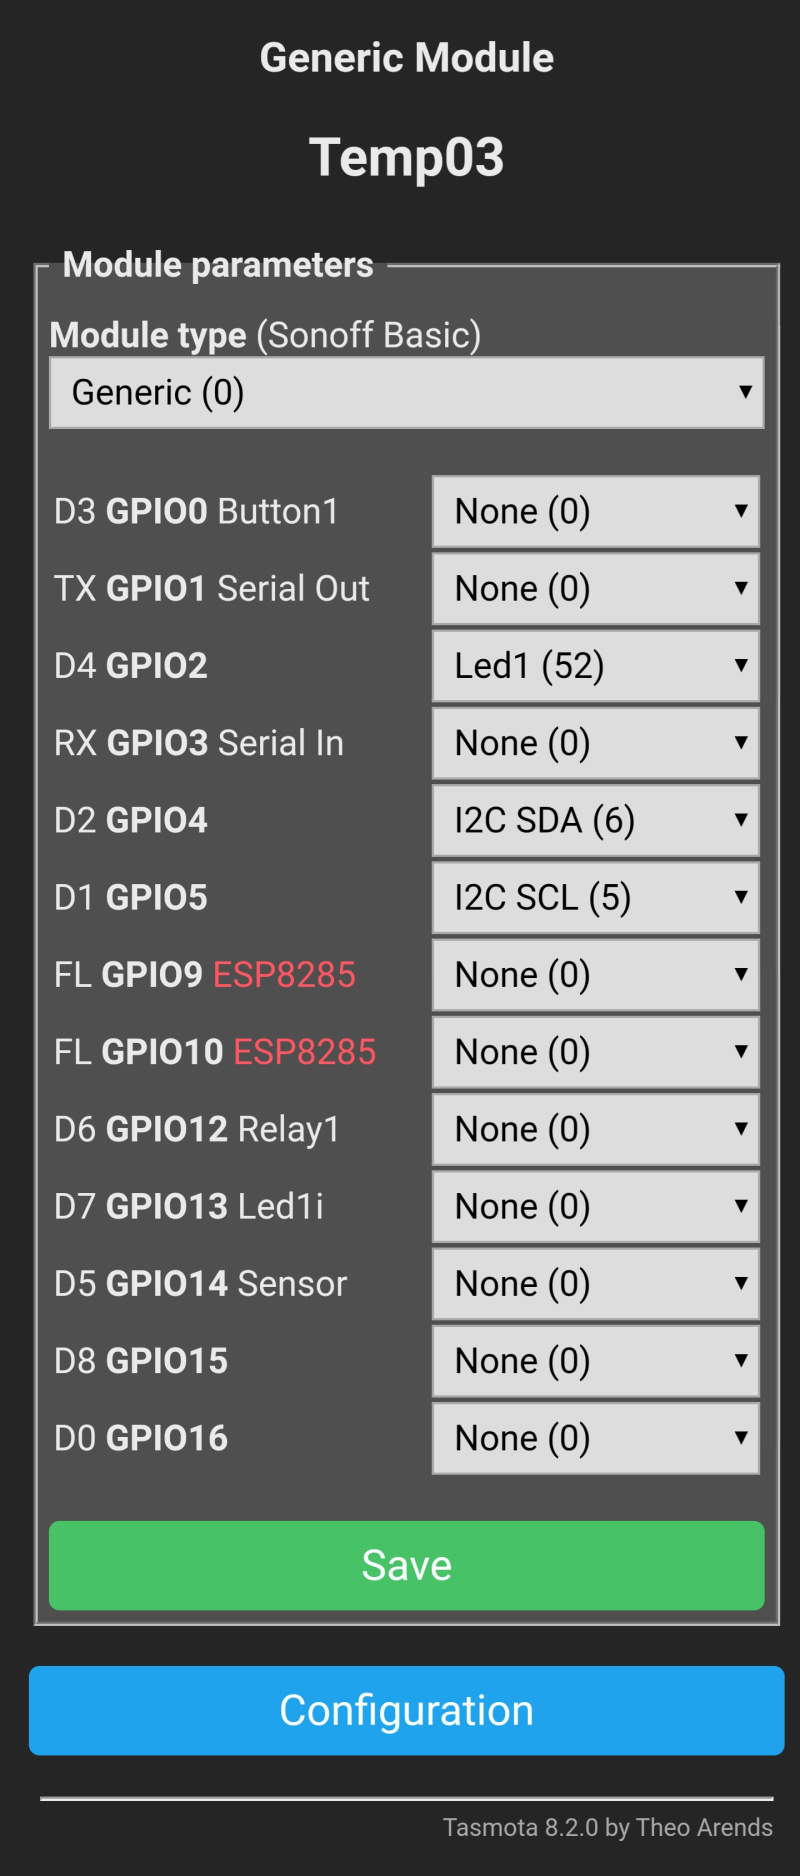
Tasmota I2C Temperature Sensor Config
The Tasmota code automatically searches for all connected I2C sensors when it boots and displays anything it finds. You do not need to tell Tasmota which sensor it is. A full list of support sensors in Tasmota can be found here.

Tasmota Showing SHT30 Sensor Data
Note: To get sensor support you will need to flash the devices with the tasmota-sensors.bin binary, instead if the generic tasmota.bin file. Sensor support was recently moved into its own binary to make the default binary smaller.
Reading the data – HTTP
You can query the data directly over HTTP using the url :
http://192.168.1.20/cm?cmnd=status%208
(Substituting for your IP number)
The response is a JSON structure containing all the sensor data.
{"StatusSNS":{"Time":"1970-01-09T03:28:52","ANALOG":{"A0":8},"SHT3X-0x45":{"Temperature":20.5,"Humidity":63.1,"DewPoint":13.2},"TempUnit":"C"}}
On a Raspberry Pi you can extract raw data values using jq to navigate the JSON Structure.
curl -s http://192.168.1.20/cm?cmnd=status%208 | jq '.StatusSNS."SHT3X-0x45".Temperature'

18.1
Note: you must encase the “SHT3X-0x45” in double quotes. It is an artefact of the jq library, it does not like the -0x in the middle of the sensor name. I don’t really know why … it works fine for sensors that don’t have funny characters in the middle. E.g. ‘.StatusSNS.MAX31855.ProbeTemperature’)
Reading the data – MQTT
You do not need to read the temperature directly from the device if you are using MQTT. By default Tasmota automatically sends “Telemetry” messages out over MQTT every 5 minutes containing all the sensor data, which can be received and processed by NodeRed.
An example MQTT “TELE” message:
{"topic":"tele/temp01/SENSOR","payload":"{\"Time\":\"2020-07-01T13:17:44\",\"SHT3X-0x45\":{\"Temperature\":26.0,\"Humidity\":47.4,\"DewPoint\":13.9},\"TempUnit\":\"C\"}","qos":0,"retain":false,"_msgid":"d1a72fd2.4d6fc"}
I configured a dashboard gauge in NodeRed to show the temperature data in real time for my internal and external temperature sensors.
Temperature Gauge NodeRed Flow
The function to extract the payload strips all the other information from the message and just returns the value in the payload ready for the dashboard gauge to display.
msg.payload = msg.payload["SHT3X-0x45"].Temperature;
return msg;

Temperature Gauge NodeRed Dashboard
Voila a simple, real-time, temperature gauge on my phone over MQTT.

Thanks for sharing this project! I am looking for a solution to build a level meter for my water tank in the garden. I have seen that Tasmota supports various ultrasonic sensors so this might be a fit.
My only concern: power supply. How did you solve this for your temperatur sensors?
For me power wasn’t an issue. I plug them in to power sockets, using a USB phone charger adapter. For my garden watering automation, I ran a power cable along my garden fence and used a 12v power supply in a weather proof box.